ip Time, Netgear 등의 여러 공유기를 쓰다가 ASUS 공유기의 평이 좋아서 구매하게 되었습니다.
사람마다 다르겠지만 제가 공유기를 구매할 때의 가장 중요하게 여기는 조건은 아래와 같습니다.
WOL(Wake On Lan), 포트포워딩(Port Fowarding), VPN(Virtual Private Lan), IoT 연결(가전)
WOL은 나스 및 서버 전원 On을 위하여 사용하고 포트포워딩은 나스나 쿠버네티스로 구성된 서비스 접속, VPN은 회사나 외부에서 접근을 위해 사용합니다.
ipTime 공유기는 WOL 등의 여러 기능이 있으나 내구성의 아쉬운 부분이 있으며, Netgear 공유기는 포트포워딩 설정이 보이지 않는 문제 및 Wi-Fi 연결, WOL 미지원 등의 아쉬운 부분이 있었습니다. ASUS 공유기는 처음 구매하게 되었으며, 사용은 더 해봐야 알겠지만 현재 기대감을 가지고 사용 중입니다.
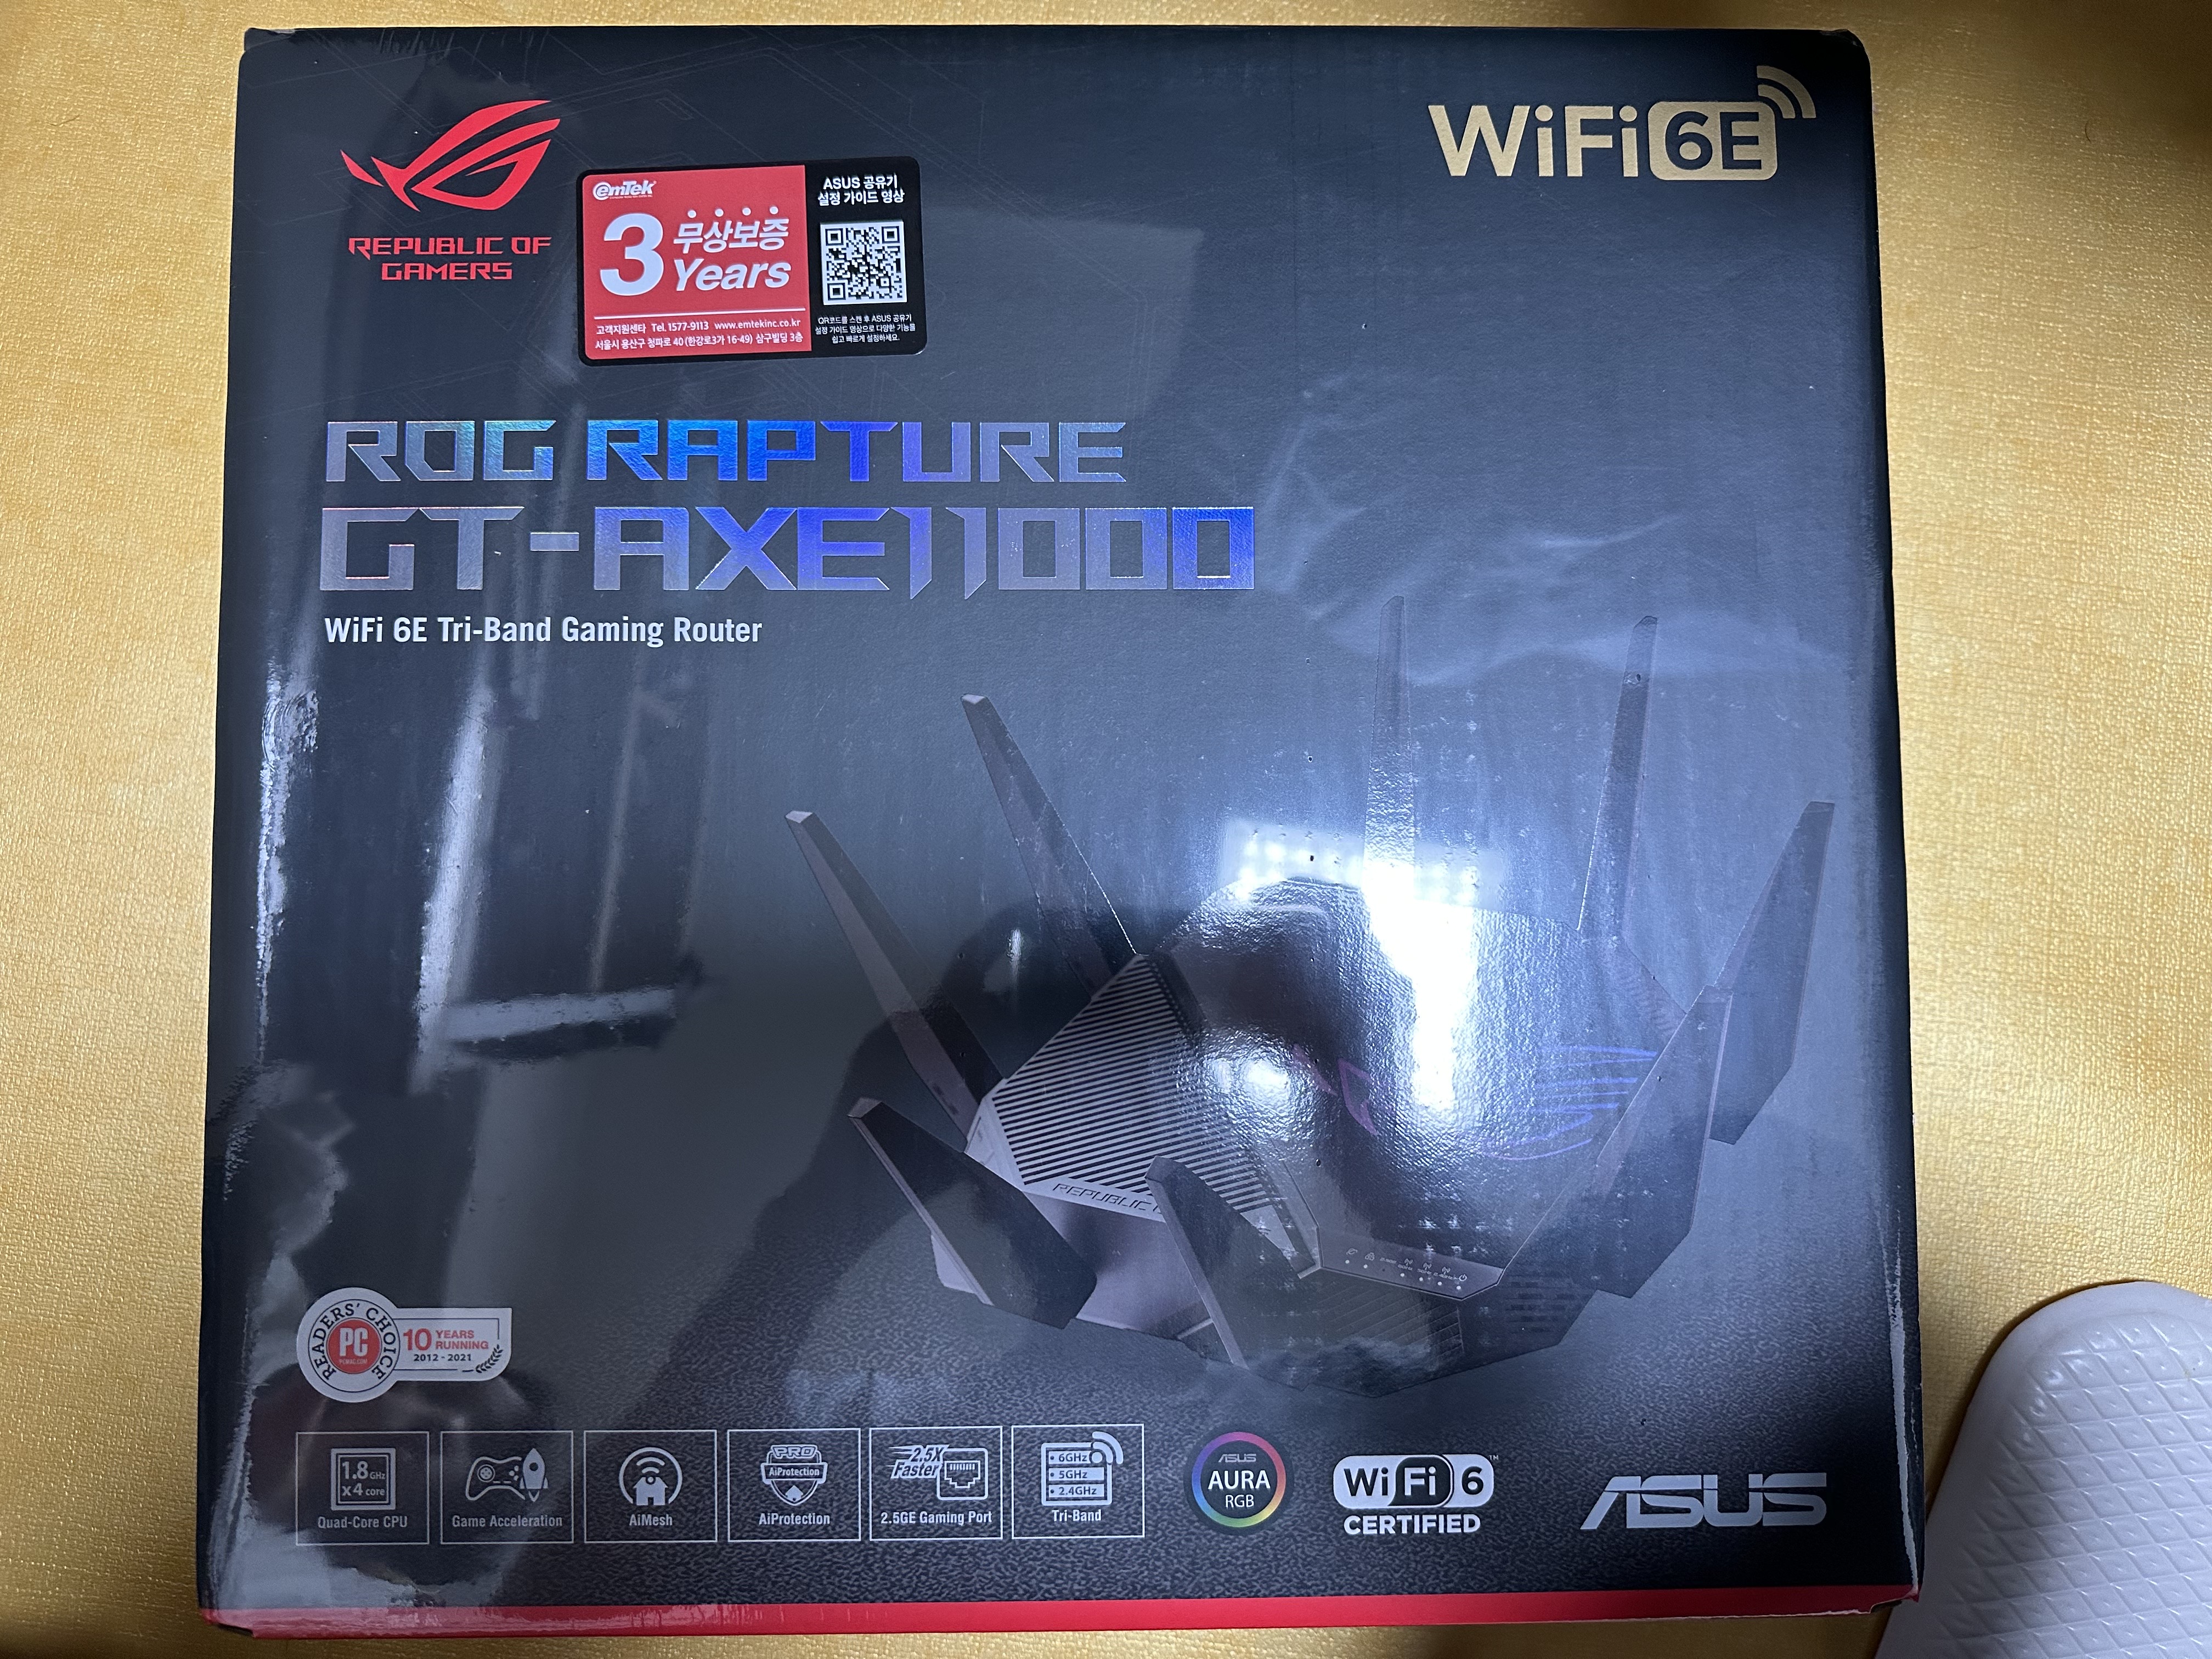
2. 개봉기
생각보다 엄청나게 큰 박스가 와서 놀랐습니다. 하이엔드급 공유기(Wi-Fi 6e 지원)라 그런지 성능도 박스도 엄청 크더군요 3년 무상 보증이라 3년간은 걱정이 크게 없을 것 같습니다.
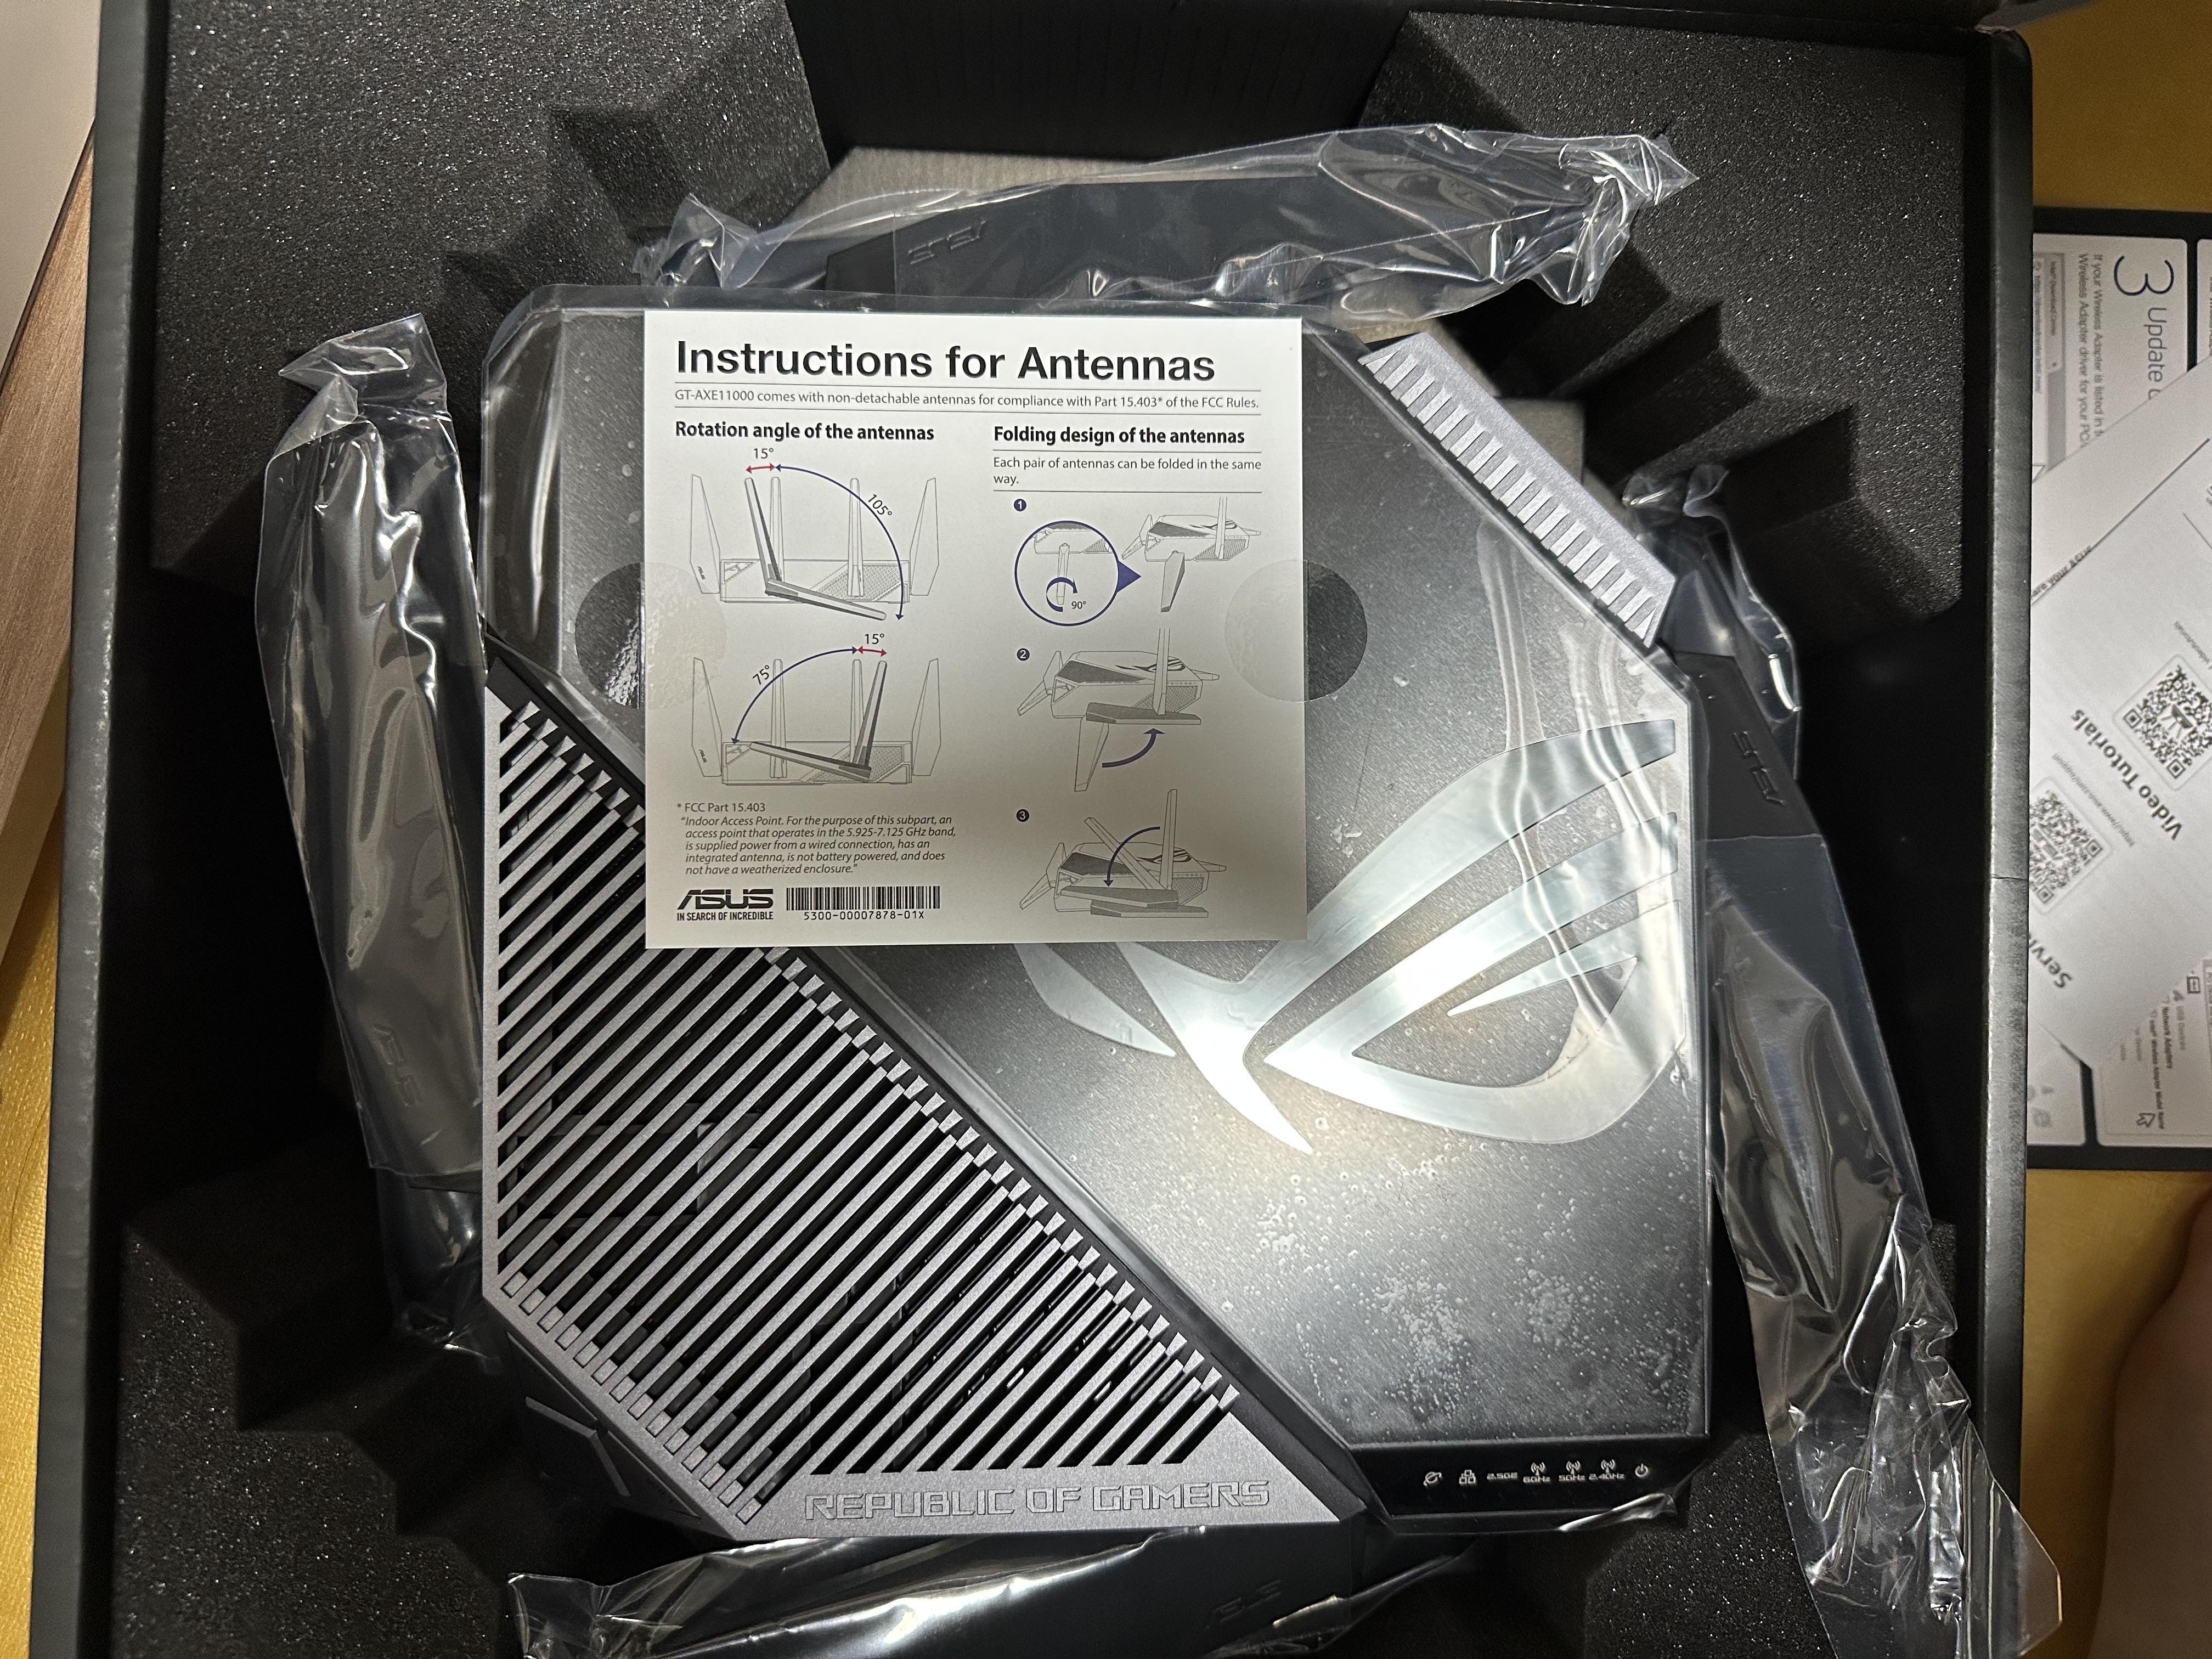
박스를 열자 웅장한 모습으로 드러냈습니다. 안테나 마다 비닐로 포장이 되어 세밀함이 느껴졌으며, 전면에는 REPUBLlC OF GAMES라는 문구가 보입니다.
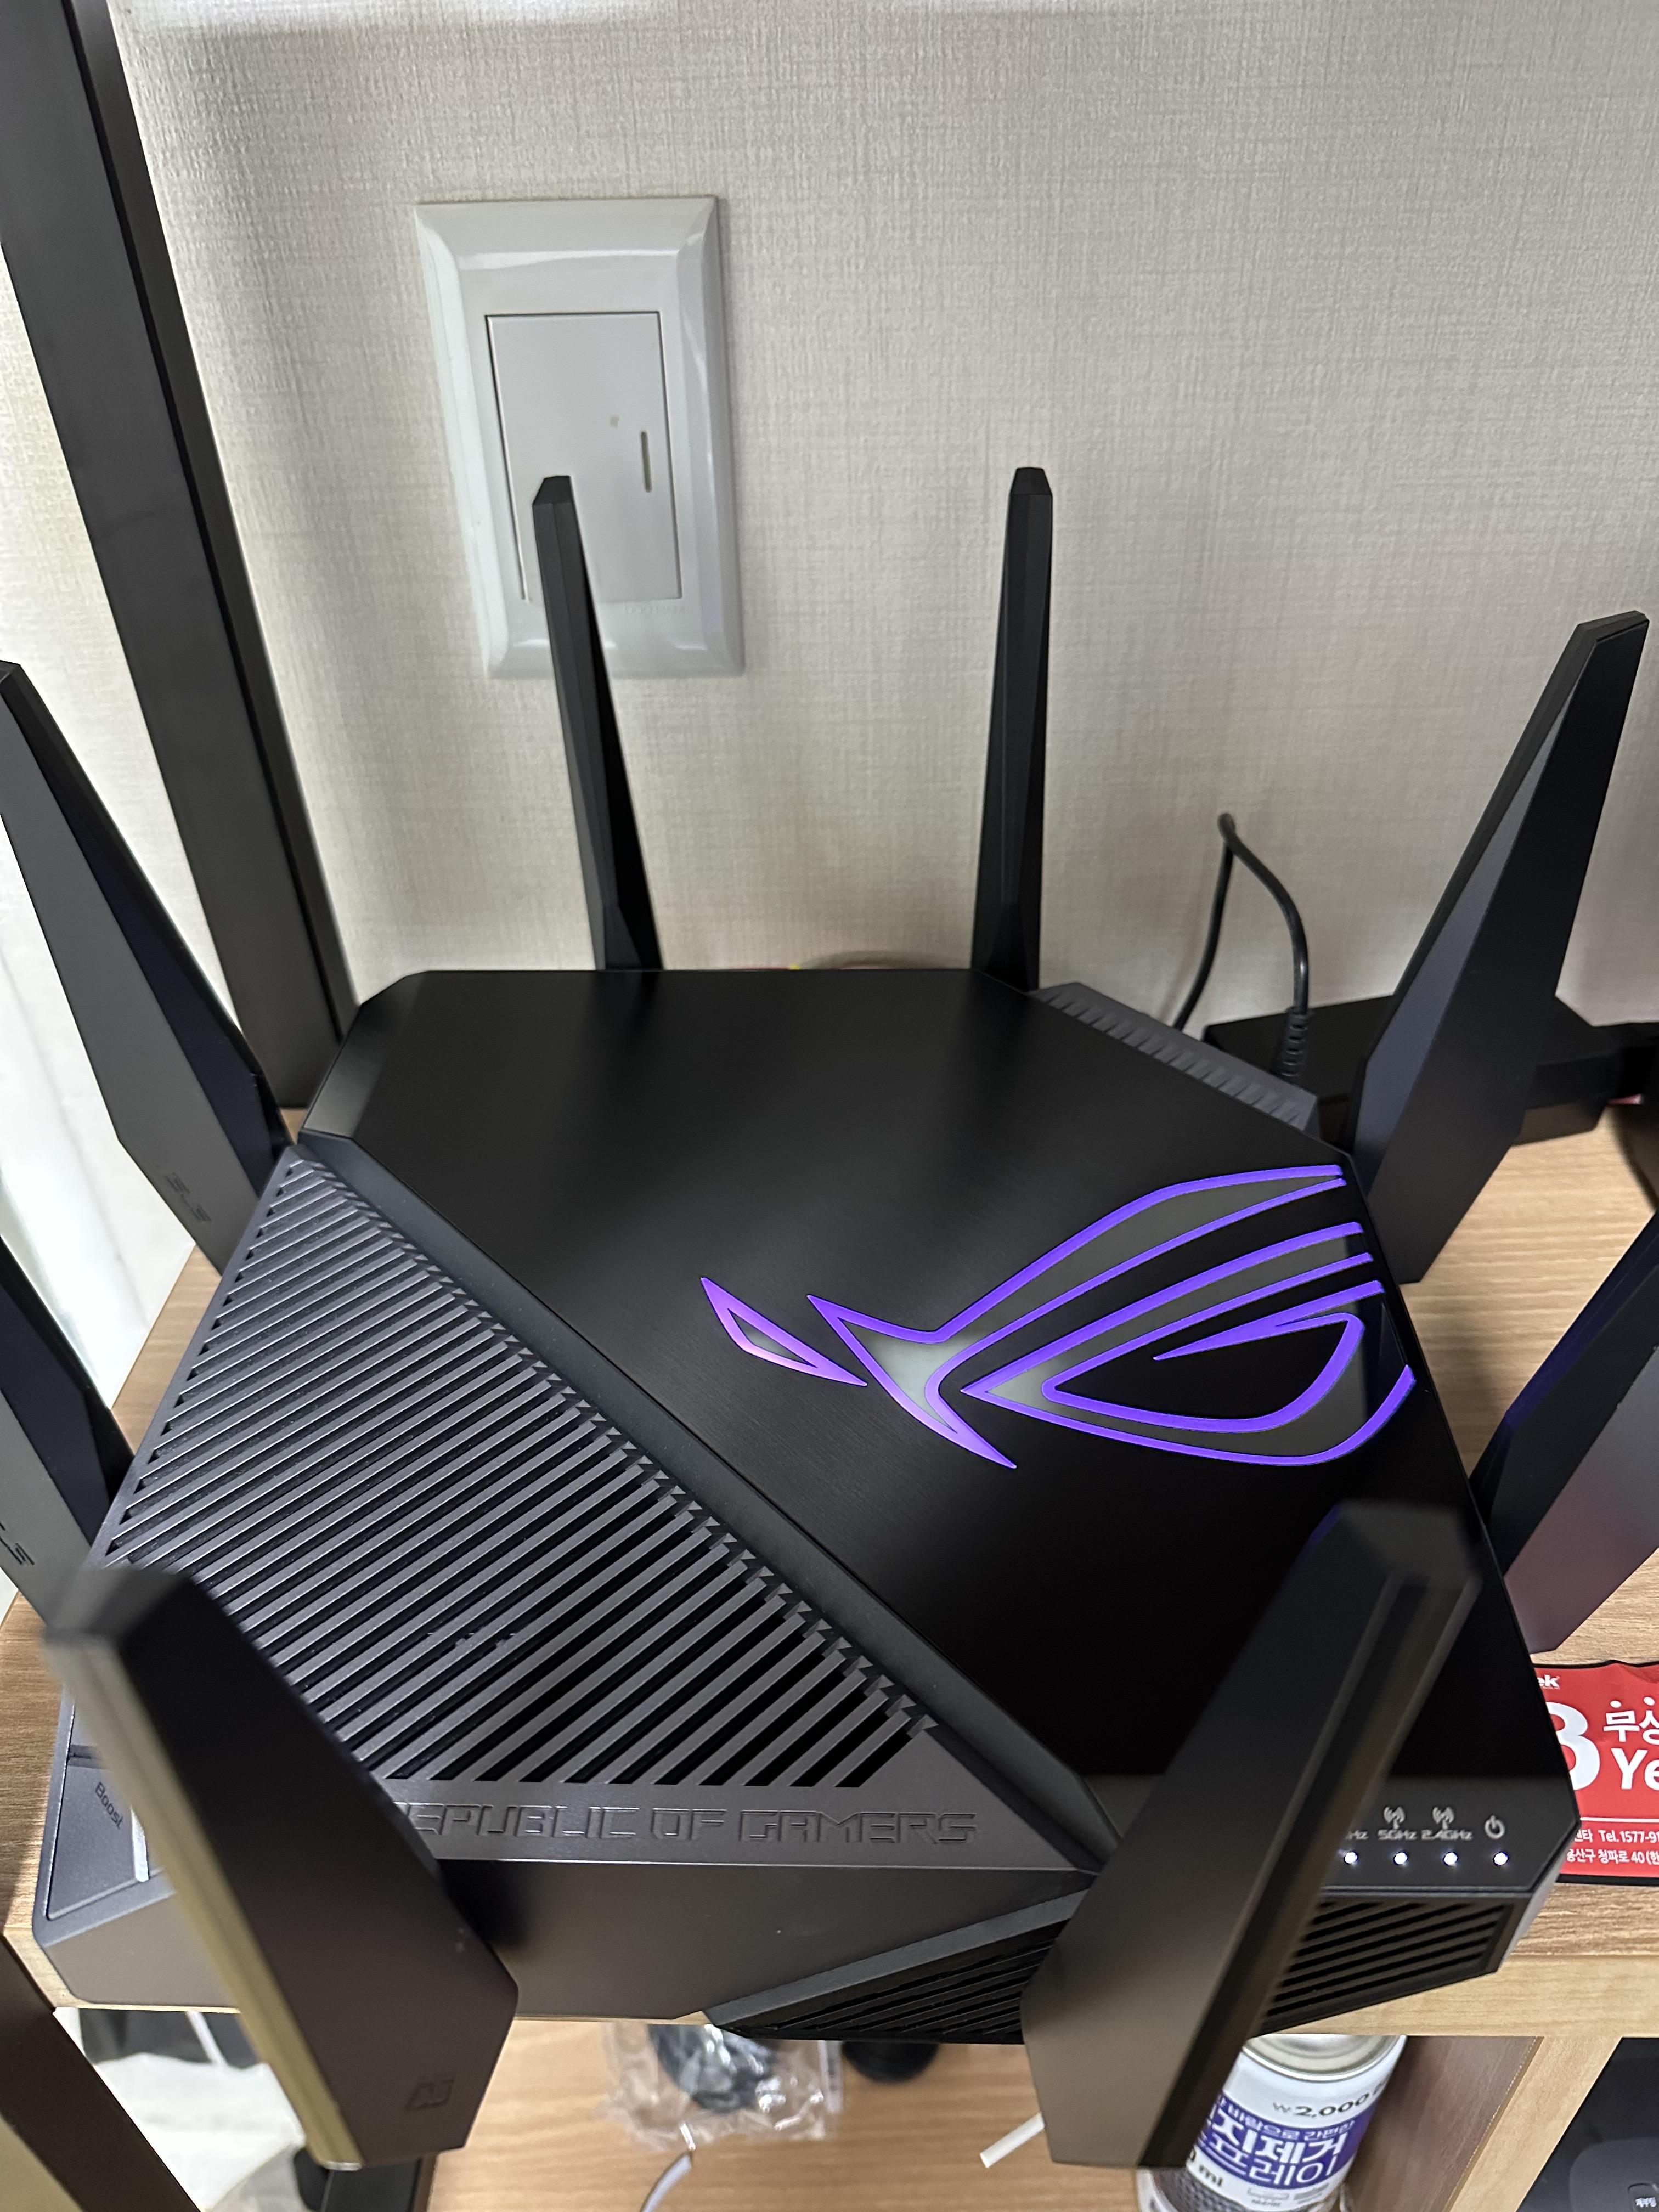
전원을 연결하면 위와 같이 전면에 AURA RGB LED가 들어오며, 색상 선택 및 표시 방식을 설정을 통해 변경할 수 있습니다.
Synology 나스와 함께 배치를 하였는데 크기가 커서 많은 공간을 차지하지만 멋있는 자태를 뽐내고 있습니다.
3. 관리 페이지
초기 페이지에 접속하면 위와 같이 아이디와 패스워드를 입력하는 로그인창이 보이게 됩니다.
로그인을 하게 되면 위와 같이 대시보드로 접근하게 됩니다. AiMesh, AiProtection 등 여러 메뉴가 보이가 됩니다.
메뉴 중에 저의 눈에 띄었던 것은 AiProtection이었습니다. 보안 회사인 Trend Micro의 네트워크 보호 기능을 제공하며, 악의적인 사이트 차단 및 양방향 IPS를 통해 홈 및 소규모 기업 네트워크에서 손쉽게 보안을 강화할 수 있는 장점이 있습니다. 하지만 사용 시에 부하가 발생될 수 있으니 판단이 필요합니다. 저는 현재 테스트를 위해 활성화 중입니다.
# override default of no subsystems
Subsystem       sftp    /usr/libexec/openssh/sftp-server -f local2 -l INFO
2. sshd 재시작
[root@localhost ~]# systemctl restart sshd
3. /etc/rsyslog.conf 수정
[root@localhost ~]# vi /etc/rsyslog.conf
#sftp log local2.* /var/log/sftp.log
4. rsyslog 재시작
[root@localhost ~]# systemctl restart rsyslog
5. sftp.log 파일 생성 및 로그 확인
[root@localhost ~]#touch /var/log/sftp.log
[root@localhost ~]#tail -f /var/log/sftp.log
Mar 26 11:47:28 is sftp-server[18171]: session opened for local user root from [192.168.0.100]
Mar 26 11:47:28 is sftp-server[18171]: opendir "/root"
Mar 26 11:47:29 is sftp-server[18171]: closedir "/root"
total 46274300
-rw-------  1 root root  498569216 Oct 19 16:49 core.10035
-rw-------  1 root root 1589530624 Oct 21 03:52 core.10403
-rw-------  1 root root 1689006080 Aug 20 04:41 core.11611
-rw-------  1 root root 1806168064 Jan 12 01:46 core.12294
-rw-------  1 root root 1666433024 Sep 24 20:47 core.12620
3. Core 파일 size 확인 (기본값 : 0)
core file size가 0일 경우 core file을 생성하지 않습니다.
[root@localhost ~]# ulimit -a
core file size          (blocks, -c) 0
data seg size           (kbytes, -d) unlimited
scheduling priority             (-e) 0
file size               (blocks, -f) unlimited
pending signals                 (-i) 32765
max locked memory       (kbytes, -l) 32
max memory size         (kbytes, -m) unlimited
open files                      (-n) 1024
pipe size            (512 bytes, -p) 8
POSIX message queues     (bytes, -q) 819200
real-time priority              (-r) 0
stack size              (kbytes, -s) 10240
cpu time               (seconds, -t) unlimited
max user processes              (-u) 32765
virtual memory          (kbytes, -v) unlimited
file locks                      (-x) unlimited
4. Core 파일의 바이너리 확인
[root@localhost ~]#gdb -c core.29019
GNU gdb (GDB) Red Hat Enterprise Linux (7.0.1-23.el5_5.2)
Copyright (C) 2009 Free Software Foundation, Inc.
License GPLv3+: GNU GPL version 3 or later <http://gnu.org/licenses/gpl.html>
This is free software: you are free to change and redistribute it.
There is NO WARRANTY, to the extent permitted by law.  Type "show copying"
and "show warranty" for details.
This GDB was configured as "i386-redhat-linux-gnu".
For bug reporting instructions, please see:
<http://www.gnu.org/software/gdb/bugs/>.
BFD: Warning: /var/domain/core.29019 is truncated: expected core file size >= 1898045440, found: 10928128.
[New Thread 29025]
[New Thread 29024]
[New Thread 29022]
[New Thread 29021]
[New Thread 29020]
[New Thread 29019]
Core was generated by `/usr/local/sbin/named'.
Program terminated with signal 6, Aborted.
#0  0x00554402 in __kernel_vsyscall ()
Dependencies Resolved

===================================================================================================================================================================================
 Package                                              Arch                                   Version                                    Repository                            Size
===================================================================================================================================================================================
Installing:
 google-authenticator                                 x86_64                                 1.04-1.el7                                 epel                                  48 k

Transaction Summary
===================================================================================================================================================================================
Install  1 Package

Total download size: 48 k
Installed size: 97 k
Is this ok [y/d/N]: y
Downloading packages:
warning: /var/cache/yum/x86_64/7/epel/packages/google-authenticator-1.04-1.el7.x86_64.rpm: Header V3 RSA/SHA256 Signature, key ID 352c64e5: NOKEY]  16 kB/s |  32 kB  00:00:01 ETA
Public key for google-authenticator-1.04-1.el7.x86_64.rpm is not installed
google-authenticator-1.04-1.el7.x86_64.rpm                                                                                                                  |  48 kB  00:00:02
Retrieving key from file:///etc/pki/rpm-gpg/RPM-GPG-KEY-EPEL-7
Importing GPG key 0x352C64E5:
 Userid     : "Fedora EPEL (7) <epel@fedoraproject.org>"
 Fingerprint: 91e9 7d7c 4a5e 96f1 7f3e 888f 6a2f aea2 352c 64e5
 Package    : epel-release-7-11.noarch (@extras)
 From       : /etc/pki/rpm-gpg/RPM-GPG-KEY-EPEL-7
Is this ok [y/N]: y
Running transaction check
Running transaction test
Transaction test succeeded
Running transaction
  Installing : google-authenticator-1.04-1.el7.x86_64                                                                                                                          1/1
  Verifying  : google-authenticator-1.04-1.el7.x86_64                                                                                                                          1/1

Installed:
  google-authenticator.x86_64 0:1.04-1.el7

Complete!
4. PAM 모듈 설정
[root@localhost ~]# vi /etc/pam.d/sshd
#%PAM-1.0
auth       required     pam_sepermit.so
auth       substack     password-auth
auth       include      postlogin

### Google Authenticator(Google OTP) ###  ← 추가
auth       required     pam_google_authenticator.so    nullok  ← 추가

# Used with polkit to reauthorize users in remote sessions
-auth      optional     pam_reauthorize.so prepare
account    required     pam_nologin.so
account    include      password-auth
password   include      password-auth
# pam_selinux.so close should be the first session rule
session    required     pam_selinux.so close
session    required     pam_loginuid.so
# pam_selinux.so open should only be followed by sessions to be executed in the user context
session    required     pam_selinux.so open env_params
session    required     pam_namespace.so
session    optional     pam_keyinit.so force revoke
session    include      password-auth
session    include      postlogin
# Used with polkit to reauthorize users in remote sessions
-session   optional     pam_reauthorize.so prepare
nullok : 리눅스 내 모든 사용자 각각의 "Secret Key"를 생성합니다. 동일한 Secret Key를 사용이 필요한 경우 때 해당 옵션을 삭제하면 됩니다.
5. ssh config 파일 수정
[root@localhost ~]# vi /etc/ssh/sshd_config
옵션
설명
PermitEmptyPasswords no
비어 있는 사용자 암호 허용 여부
PasswordAuthentication no
패스워드 인증 사용 여부(OTP 인증시에는 사용X)
ChallengeResponseAuthentication yes
시도-응답 인증 방식을 사용 여부(2-Factor 인증을 위해 필요)
UsePAM yes
인증 PAM 모듈 사용 여부
위 표와 같이 수정을 합니다.
6. sshd 재시작
[root@localhost ~]# systemctl restart sshd
7. Google Authenticator 인증 파일 생성
[root@localhost ~]# google-authenticator
1) 인증 토근을 시간 기반(Time-Based)으로 선택
Do you want authentication tokens to be time-based (y/n) y
QR 코드가 생성되고 QR 코드 밑에 아래와 같이 Secret Key와 백업 코드가 출력됩니다.
Your new secret key is: IPUUHIOMJ4YVDZEKN7D62HSPO4 Your verification code is 092264 Your emergency scratch codes are: 66905078 21438147 22384034 77127198 68711227
2) Secret Key 및 백업 코드 저장 file 위치 확인
Do you want me to update your "/root/.google_authenticator" file? (y/n) y
Do you want to disallow multiple uses of the same authentication token? This restricts you to one login about every 30s, but it increases your chances to notice or even prevent man-in-the-middle attacks (y/n) y
4) 시간 오차 또는 왜곡 방지 사용 여부
By default, a new token is generated every 30 seconds by the mobile app. In order to compensate for possible time-skew between the client and the server, we allow an extra token before and after the current time. This allows for a time skew of up to 30 seconds between authentication server and client. If you experience problems with poor time synchronization, you can increase the window from its default size of 3 permitted codes (one previous code, the current code, the next code) to 17 permitted codes (the 8 previous codes, the current code, and the 8 next codes). This will permit for a time skew of up to 4 minutes between client and server. Do you want to do so? (y/n) y
5) 무차별 대입 공격 방지 사용 여부
If the computer that you are logging into isn't hardened against brute-force login attempts, you can enable rate-limiting for the authentication module. By default, this limits attackers to no more than 3 login attempts every 30s. Do you want to enable rate-limiting? (y/n) y
공격자가 30 초마다 3번 이상 로그인을 시도하지 못하도록 제한 옵션이며, 3회 이상 인증 실패시 일시적으로 로그인을 차단합니다.
8. 구글 OTP 앱에서 설정
1) Google Authentication 시작하기
시작하기 버튼을 클릭합니다.
2) QR 코드 확인
QR 코드 스캔 버튼을 클릭합니다. 위에서 생성된 QR 코드를 스캔합니다.(설정 키를 입력해도 됩니다.)
3) Verification code 입력 창
Google-Authentication이 설정되면 Secure CRT에서 패스워드를 입력 후에 위와 같이 Verfication code를 입력하는 창이 보여지게 됩니다.
4) 스마트폰 Google Authentication App에서 코드 확인
랜덤한 숫자가 발생되며, 오른쪽에 남은 시간이 표시됩니다.
5) Verification code 입력
Google Authentication 앱에서 생성된 코드를 입력하고 OK 버튼을 클릭합니다.
9. 일반 사용자 Google OTP 설정
1) 사용자 계정 생성 및 패스워드 지정
[root@localhost ~]# useradd latch [root@localhost ~]# passwd latch Changing password for user latch. New password: Retype new password: passwd: all authentication tokens updated successfully.
2) 사용자 계정으로 로그인
[root@localhost ~]# su latch [latch@localhost ~]# google-authenticator
3) Goole Authenticator 설정(사용자 계정)
QR 코드가 생성되고 QR 코드 밑에 아래와 같이 Secret Key와 백업 코드가 출력됩니다.
기존(/etc/network의 interfaces 파일 수정) 네트워크 설정이 /etc/netplan(17버전 이상)으로 변경되었습니다.
2. 00-installer-config.yaml 수정
root@latch:~# vi 00-installer-config.yaml
# This is the network config written by 'subiquity'
network:
  ethernets:
        ens160:
                dhcp6: no
                addresses: [192.168.0.100/24]
                gateway4: 192.168.0.1
                nameservers:
                        addresses: [168.126.63.1, 168.126.63.2]

  version: 2
CONTAINER ID   IMAGE     COMMAND                  CREATED              STATUS              PORTS                NAMES
22e28bdc7f4e   nginx     "/docker-entrypoint.…"   About a minute ago   Up About a minute   0.0.0.0:80->80/tcp   webserver
nginx 서버가 작동 중인 것을 확인할 수 있습니다.
5. 컨테이너 작동 확인
root@latch:~# docker container stats webserver
CONTAINER ID   NAME        CPU %     MEM USAGE / LIMIT     MEM %     NET I/O       BLOCK I/O     PIDS
22e28bdc7f4e   webserver   0.00%     2.551MiB / 3.853GiB   0.06%     1.05kB / 0B   0B / 8.19kB   2
CONTAINER ID   NAME        CPU %     MEM USAGE / LIMIT     MEM %     NET I/O       BLOCK I/O     PIDS
22e28bdc7f4e   webserver   0.00%     2.551MiB / 3.853GiB   0.06%     1.05kB / 0B   0B / 8.19kB   2
6. 컨테이너 정지
root@latch:~# docker stop webserver webserver
7. 컨테이너 실행
root@latch:~# docker start webserver webserver
8. 웹 페이지 확인
nginx 웹 페이지가 열리는 것을 확인할 수 있습니다.
9. 컨테이너 접속
root@latch:~# docker exec -i -t webserver bash root@22e28bdc7f4e:/etc/nginx/conf.d# vi default.conf
server {
    listen       80;
    listen  [::]:80;
    server_name  localhost;

    #charset koi8-r;
    #access_log  /var/log/nginx/host.access.log  main;

    location / {
        root   /usr/share/nginx/html;
        index  index.html index.htm;
    }

    #error_page  404              /404.html;

    # redirect server error pages to the static page /50x.html
    #
    error_page   500 502 503 504  /50x.html;
    location = /50x.html {
        root   /usr/share/nginx/html;
    }

    # proxy the PHP scripts to Apache listening on 127.0.0.1:80
    #
    #location ~ \.php$ {
    #    proxy_pass   http://127.0.0.1;
    #}

    # pass the PHP scripts to FastCGI server listening on 127.0.0.1:9000
    #
    #location ~ \.php$ {
    #    root           html;
    #    fastcgi_pass   127.0.0.1:9000;
    #    fastcgi_index  index.php;
    #    fastcgi_param  SCRIPT_FILENAME  /scripts$fastcgi_script_name;
    #    include        fastcgi_params;
    #}

    # deny access to .htaccess files, if Apache's document root
    # concurs with nginx's one
    #
    #location ~ /\.ht {
    #    deny  all;
    #}
}
webserver 컨테이너 안에 nginx conf 파일에 접근이 되는 것을 확인 할 수 있습니다.
10. 컨테이너 저장 위치 확인
root@latch:~# docker exec -i -t webserver bash
root@22e28bdc7f4e:/# touch a.txt
root@22e28bdc7f4e:/# ls
a.txt bin boot dev docker-entrypoint.d docker-entrypoint.sh etc home lib lib64 media mnt opt proc root run sbin srv sys tmp usr var
root@22e28bdc7f4e:/# exit exit
root@latch:~# cd /var/lib/docker/overlay2/1013953725dd5bcd0f153131609726fc2723fe2616dc8df31ab22bb85f3ddad3/diff
root@latch:/var/lib/docker/overlay2/1013953725dd5bcd0f153131609726fc2723fe2616dc8df31ab22bb85f3ddad3/diff# ls a.txt etc root run tmp usr var
Reading package lists... Done
Building dependency tree
Reading state information... Done
E: Unable to locate package docker
E: Unable to locate package docker-engine
E: Unable to locate package docker.io
E: Couldn't find any package by glob 'docker.io'
E: Couldn't find any package by regex 'docker.io'
E: Unable to locate package containerd
E: Unable to locate package runc
[root@localhost ~]# sudo yum remove docker docker-client docker-client-latest docker-common docker-latest docker-latest-logrotate docker-logrotate docker-engine Loaded plugins: fastestmirror No Match for argument: docker No Match for argument: docker-client No Match for argument: docker-client-latest No Match for argument: docker-common No Match for argument: docker-latest No Match for argument: docker-latest-logrotate No Match for argument: docker-logrotate No Match for argument: docker-engine No Packages marked for removal 구 버전이 존재할 경우 구 버전을 삭제합니다.
Unable to find image 'hello-world:latest' locally
latest: Pulling from library/hello-world
0e03bdcc26d7: Pull complete
Digest: sha256:1a523af650137b8accdaed439c17d684df61ee4d74feac151b5b337bd29e7eec
Status: Downloaded newer image for hello-world:latest

Hello from Docker!
This message shows that your installation appears to be working correctly.

To generate this message, Docker took the following steps:
 1. The Docker client contacted the Docker daemon.
 2. The Docker daemon pulled the "hello-world" image from the Docker Hub.
    (amd64)
 3. The Docker daemon created a new container from that image which runs the
    executable that produces the output you are currently reading.
 4. The Docker daemon streamed that output to the Docker client, which sent it
    to your terminal.

To try something more ambitious, you can run an Ubuntu container with:
 $ docker run -it ubuntu bash

Share images, automate workflows, and more with a free Docker ID:
 https://hub.docker.com/

For more examples and ideas, visit:
 https://docs.docker.com/get-started/
6. Docker 버전 확인
[root@localhost ~]# docker version
Client: Docker Engine - Community
 Version:           20.10.2
 API version:       1.41
 Go version:        go1.13.15
 Git commit:        2291f61
 Built:             Mon Dec 28 16:17:48 2020
 OS/Arch:           linux/amd64
 Context:           default
 Experimental:      true

Server: Docker Engine - Community
 Engine:
  Version:          20.10.2
  API version:      1.41 (minimum version 1.12)
  Go version:       go1.13.15
  Git commit:       8891c58
  Built:            Mon Dec 28 16:16:13 2020
  OS/Arch:          linux/amd64
  Experimental:     false
 containerd:
  Version:          1.4.3
  GitCommit:        269548fa27e0089a8b8278fc4fc781d7f65a939b
 runc:
  Version:          1.0.0-rc92
  GitCommit:        ff819c7e9184c13b7c2607fe6c30ae19403a7aff
 docker-init:
  Version:          0.19.0
  GitCommit:        de40ad0